Posted on 2 Comments

A feature and a tip…

In September I attended the first ever SewPro Convention.  I learned a lot and met so many fantastic people.  Among them was Anne Beier of Hudson Valley Quilts.  I feel so fortunate to have connected with her!  She is an energetic and studious sewist.  I love her inquisitive nature and her ability to turn her ideas into words.

This is why I feel so lucky to be featured on her blog.  Not only have we become friends, but we are collaborative colleagues now.

Please visit Anne’s blog if you want to get to know me and check out the fabulous giveaway we are offering together.

I am also offering a couple of Half Square Triangle [HST] assembly tips if you are interested in working with HSTs.

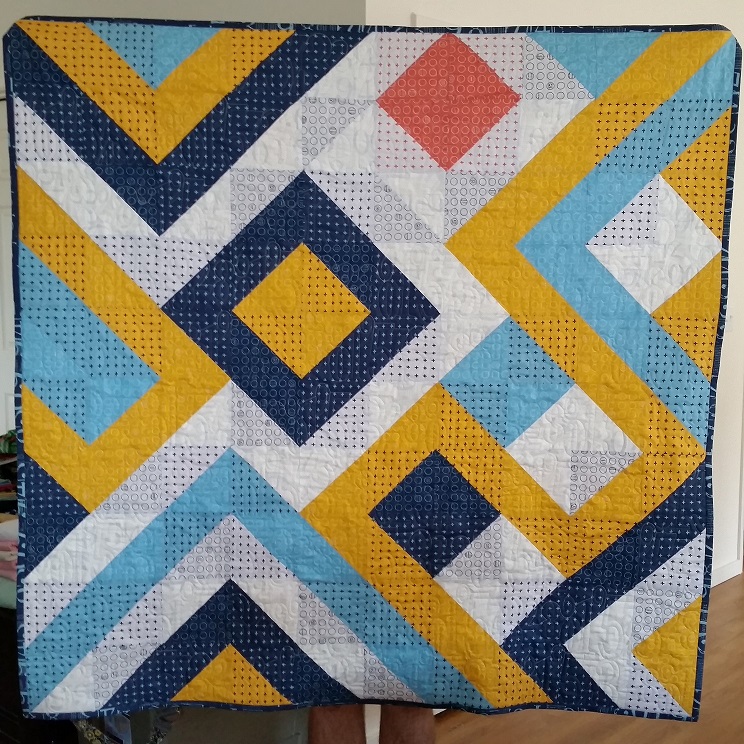
There are so many ways to make HSTs.  You can make them one at a time, two at a time, 4 at a time and even 8 or more at a time!  I prefer to make mine 2 at at time.  For me, this way works best because there is less waste and not as much need for squaring up.  I like using this method for HSTs smaller than 5 inches because it requires no marking.

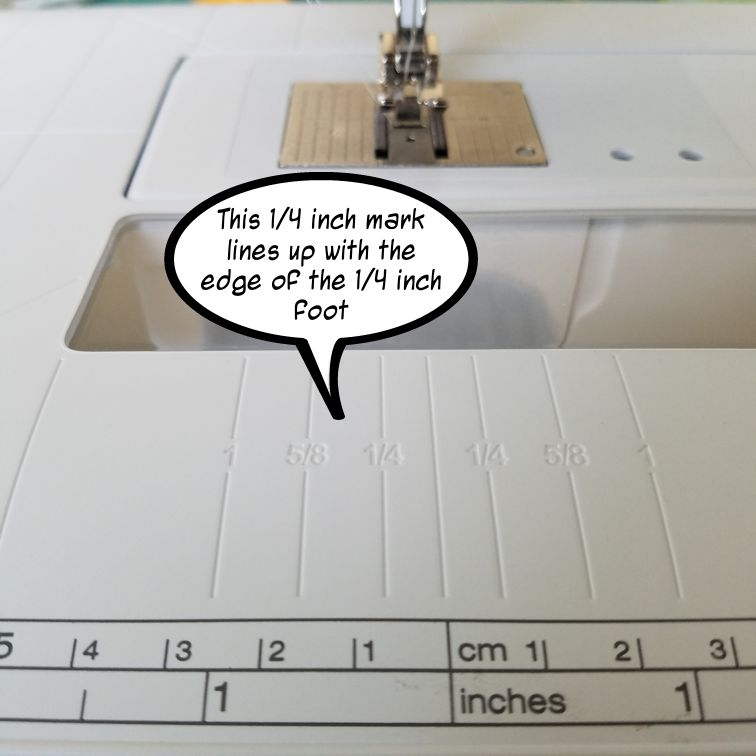
One of the features I love about my Bernina is the measurements marked on my sewing table.  So I use the 1/4 inch mark to line up the tape with the edge of my 1/4 inch foot.

Bernina sewing table

Place a 4 or 5 inch piece of painter’s tape or washi tape on the table of your sewing machine making sure to line it up with the edge of your 1/4 inch foot.placement of tape guide

Set up your squares in pairs, Right Sides Together (RST) with corners lined up.

Start by aligning the back corner of your square pair with the edge of your presser foot.  Then align the opposite corner with the edge of the tape, while keeping this corner aligned with the tape, stitch your seam.

Align corners with foot and tape

You can chain piece the HSTs by aligning the next square with the edge of the presser foot and tape.  I like to pull about an inch of thread between each square.

align corners with edge of foot and tape

To stitch on the other side of center, turn squares around and align the corners with the seam you already stitched to the left of the presser foot.

turn squares and keep stitched seam to the left

To separate your HSTs,  cut between the seams by aligning your ruler with the two opposite corners.

Trim the ‘dog ears’ of each HST by cutting the corners at the seam perpendicular to the outside raw edge.  When pressed open or to one side the corners will not add bulk to your seams because they are gone.

trim the 'dog ears'

Enjoy making your HSTs.  Please visit Anne at Hudson Valley Quilts to learn a little more about me!

Posted on 6 Comments

It’s a pattern…finally!!

My first pattern!!

Ten Squared is now a pattern…celebration time!!  You can find it in my pattern store on Craftsy.  Find the pattern in my Etsy Store.

It all started with half square triangles (HSTs).  I wanted to make an entire quilt with HSTs.  And this was the product of that exploration.

TenSquared_First

When I started I had no intention of making this into a pattern.  I just wanted to experiment with HSTs. First I started out with a rough sketch of what I wanted to do with the squares and the lines going around them.   Then, I selected 5 colors and chose 2 to 3 different fabrics in each of those 5 colors.   Using those fabrics, I cut 6 inch squares and just made a whole bunch of HSTs using the fabrics I chose.  After I started placing them on my design wall, I saw that I was not going to get the exact image of my sketch because of the grid the HSTs fell on. So I modified it a bit and let the HSTs take me where they would allow.

I really wanted something asymmetrical with some dynamic movement.  The high contrast of the fabrics really plays well with those elements and gives this quilt a serious pop!

So I was asked a few times if I was making a pattern, and this being my first quilt from start to finish I wasn’t sure if I could even sell my own pattern, let alone design it for others to understand.  But, I set out to try to make my first pattern.

I even made a second Ten Squared to see if I could recreate it.  This one was for my husband, and I used 7.5 inch squares.

tensquaredtoo_1
Ten Squared Too

After putting some directions down on paper and trying out a few tests patterns, in extra large and miniature form, I asked a few friends to test the pattern for me.  I received some amazing photo samples of the quilts they made.

This quilt was used from a fat quarter set I sent with the tester…and she did an amazing job.

TenSquaredSunriseSM
Sunrise lap quilt by Alli of @sayonion

A friend who has just started her quilting journey put this beauty together, and it was only her second quilt!

TenSquaredBlueSm
by Deanna at @selgmom

Ten Squared is a PDF pattern only available for download on Craftsy Etsy Store.  This pattern is considered a beginner pattern. There is limited instruction of assembling HSTs.  The finished size of this quilt depends on the size of square you start with.  The pattern includes some fabric requirements and finished measurements for some standard size quilts.  I have included a coloring page with the pattern so you can audition different colors and fabric choices to get your quilt just right for you.

If you make a Ten Squared quilt, please post an image of the project on Craftsy Etsy Storeunder the Finished Project link on the pattern page.  If you share your quilt on social media, be sure to use #tensquaredquilt and tag me @penguinfeats so I can see your quilt!  I would love to see your interpretation of the pattern!


Posted on 2 Comments

Aloha Friday!!

Hot N Cold Pack Template

It is Aloha Friday here and the sky is blue!  I put together a fun pineapple block yesterday and am posting the pattern and some directions here if you want to put one together too.  It has a lot of little pieces that give this pineapple lots of texture just like the juicy pineapples I buy at the local markets.

First you will need to know how to put together Half Square Triangles (HSTs).  There is a little bit of instruction in the pdf file, but, it is not detailed.  This pattern uses the traditional method for putting HSTs together and I recommend the tutorial at Blossom Heart Quilts.

First you will need to put together the dark yellow HSTs by putting together 5 pairs of dark yellow fabrics and creating 10 HSTs.

You will take 4 of those HSTs to make the dark yellow/light yellow HSTs.  Trim the light yellow fabric to the same size as the dark yellow HSTs.

step1


Draw a line on the light yellow and place right sides together with one of the dark yellow HSTs.  Make sure to place your drawn line perpendicular to the dark yellow HST.   Stitch a 1/4 inch seam on each side of this line. Cut on the drawn line to separate the HSTs and press seams open.  Repeat 3 more times to make 8 of these finished HSTs.

step2

Next you will create 2 light yellow/dark yellow HSTS.  Take 1 yellow square and 1 dark yellow square and create 2 HSTs.

draw

Trim 2 background squares to the same size as the dark yellow/light yellow HSTs. This will make approximately a 2 1/8 inch square.

trimHST

Draw a line corner to corner on the back of the background fabric and align it perpendicular to the dark yellow/light yellow HST with the fabrics right sides together.  Stitch a 1/4 inch seam on each side of the line and cut on the drawn line to separate the HSTs. Repeat to make 2 more HSTs.

bkgdHST


Trim 2 background squares to the same size as the finished HSTs.  This should make all your squares approximately 1 3/4 inch.

trimbkgd

Additionally you will need 1 HST made up of the light yellow and background fabric.  Trim to the finished HST size of 1 3/4 inch square.  Also take one of the leftover HSTs with 2 dark yellow fabrics and trim to the finished HST size of approximately 1 3/4 inch square.  Cut this HST in half on the diagonal to create the top center triangle of the pineapple bottom.

Sew the pineapple bottom together in rows on the diagonal as shown in the pattern.  Stitch the triangle pieces to the corners of the pineapple bottom to extend the block out.

Now you can create the paper pieced top and add the triangle pieces to the corners of it as well.  Trim the pineapple top 1/4 inch below the dotted line where it says to attach the pineapple bottom.  Trim the pineapple bottom to be even with the top center triangle.

Match seams and sew a 1/4 inch seams to attach the pineapple top and bottom.  I prefer to press all my seams open, but you can press the seams to what is comfortable for you.

Please connect to the Penguin Feats Newsletter to get the PDF pattern for the Piece by Piece PIneapple.

Pineapple Block Tutorial